
Home
Quinoa Salad


- 1/2 cup of quinoa
- 1 cup of water
- 1/2 cup of cherry tomatoes, halved
- 1/2 cup of cucumber, chopped
- 1/4 cup of feta cheese, crumbled
- 2 tablespoons of your favorite vinaigrette
Instructions:
- Rinse the quinoa under cold water until the water runs clear.
- In a saucepan, combine the quinoa and water. Bring it to a boil, then reduce heat to low, cover, and simmer for about 15 minutes, or until quinoa is tender and water has been absorbed.
- Remove the quinoa from the heat and let it stand, covered, for 5 minutes. Fluff with a fork.
- Allow the quinoa to cool to room temperature. You can place it in the fridge to speed up this process.
- Once the quinoa is cooled, combine it with the cherry tomatoes, cucumber, and crumbled feta in a large bowl.
- Drizzle the salad with your favorite vinaigrette and mix until the salad is evenly coated. Serve immediately, or refrigerate until ready to serve.
Skillet Scramble


Ingredients:
- 4 large eggs
- 1 medium bell pepper, diced
- 1 small onion, diced
- 1/2 cup of shredded cheese (choose your favorite variety)
- Salt and pepper to taste
- 1 tablespoon of olive oil or butter for sautéing
Instructions:
- Begin by cracking the eggs into a bowl, season with salt and pepper, and beat them lightly with a fork. Set them aside.
- Heat a skillet over medium heat. Add the olive oil or butter and let it melt and coat the bottom of the skillet.
- Add the diced bell pepper and onion to the skillet. Sauté the vegetables until they become soft and the onions are translucent. This usually takes about 5 minutes.
- Pour the beaten eggs over the sautéed vegetables in the skillet. Allow the eggs to cook without stirring for a minute or so, until they start to set around the edges.
- Gently stir the eggs and vegetables, cooking until the eggs are almost fully set.
- Sprinkle the shredded cheese evenly over the top of the egg and vegetable mixture. Cover the skillet and let it sit for a minute or two, just until the cheese is melted.
- Once the cheese is melted, remove the skillet from the heat. Your skillet scramble is ready to serve. Enjoy this hearty and nutritious start to your day!
LUXMOM Emergency Survival Kit and First Aid Kit: A Reliable Companion for Outdoor Adventures

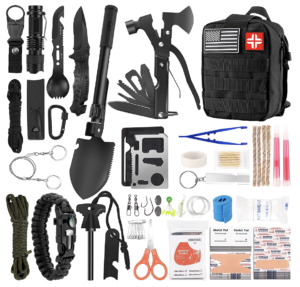
Introduction
The LUXMOM Emergency Survival Kit and First Aid Kit is a comprehensive and practical set of survival gear and equipment designed to provide safety and protection during outdoor adventures and emergencies. This professional kit includes 142 pieces of essential tools, first aid supplies, and fishing tools that cater to different needs and ensure comprehensive protection. In this review, I will discuss the product’s design and quality, its key features and functionality, a comparison with similar products, pros and cons, why this kit stands out from others, genuine user experiences and testimonials, tips and tricks to maximize its usage, FAQs, and a conclusion with a recommendation for a specific audience.
Design and Quality
The LUXMOM Emergency Survival Kit and First Aid Kit are thoughtfully designed to be compact, lightweight, and durable. All items are neatly arranged in a 600D nylon bag that measures 9 inches x 6 inches x 5 inches, making it easy to carry and store. The bag is made of high-quality 600D nylon material, ensuring its durability and resistance to wear and tear. The two-way and full open zipper allows quick access to the emergency accessories inside, and the MOLLE compatible straps with snaps enable attachment to other MOLLE compatible backpacks or belts.
Key Features and Functionality
This survival kit offers a wide range of essential tools and supplies for outdoor adventures and emergencies. It includes a 14-in-1 hatchet with a durable stainless steel construction, a folding shovel with pick for digging, cutting, and clearing, and a well-designed tactical bag with ample room for additional supplies. The kit also features a comprehensive first aid kit with 106 pieces, ensuring prompt treatment of wounds and preventing infections. Other tools and accessories, such as a flashlight, survival bracelet, dual-tube whistle, wire saw, emergency blanket, fire starting tools, fishing tools, and more, further enhance the kit’s functionality.
Comparison with Similar Products
Compared to similar products on the market, the LUXMOM Emergency Survival Kit and First Aid Kit stands out for its comprehensive range of tools and supplies. While there are other survival kits available, many of them lack the combination of first aid supplies, survival tools, and fishing tools that this kit offers. The inclusion of a fishing tools set is particularly unique, allowing users to procure food in survival situations. The compact and durable design of the kit also sets it apart, ensuring easy storage and long-lasting performance.
Pros and Cons
Pros:
- Comprehensive range of survival tools, first aid supplies, and fishing tools
- Compact and lightweight design for easy carrying and storage
- Durable 600D nylon bag for long-lasting performance
- Quick and convenient access to emergency accessories with two-way zipper
- MOLLE compatible straps for attachment to other bags or belts
Cons:
- The size of the kit may be smaller than expected for some users
- Durability of some items may be a concern in prolonged survival situations
User Experiences and Testimonials
According to user reviews, the LUXMOM Emergency Survival Kit and First Aid Kit has received positive feedback for its quality and usefulness. Users appreciate the kit’s comprehensive range of tools and supplies, which provide peace of mind during outdoor adventures and emergencies. The durability of the bag and the convenience of the two-way zipper have been commended, ensuring easy access to the necessary items. Users have also found the kit to be a great gift option for outdoor enthusiasts and appreciate the inclusion of fishing tools for additional utility.
Tips and Tricks for Optimal Usage
To maximize the benefits of the LUXMOM Emergency Survival Kit and First Aid Kit, here are some tips and tricks:
- Familiarize yourself with the functions and uses of each tool and accessory in the kit. Consider practicing with them in a controlled environment to ensure familiarity and proficiency.
- Regularly check the expiration dates of the first aid supplies and replenish them as needed.
- Customize the kit by adding personal items and additional supplies that suit your specific needs and preferences.
- Keep the kit in a easily accessible location, such as your car, backpack, or emergency bag, so that it is readily available in times of need.
FAQ
Q: Is the kit of good quality? Will the items break after the first use? A: The LUXMOM Emergency Survival Kit and First Aid Kit is of decent quality. While it may not be heirloom-level, it provides mid to low-tier items that are suitable for emergency situations. It is important to note that some items in the kit are disposable and may need to be replenished. Overall, the kit offers a good combination of quantity and usefulness.
Q: What is the safety pin used for? A: The safety pins in the kit can be used for various purposes, such as reattaching items or makeshift repairs in emergency situations. They can be handy for securing bandages, clothing, or gear temporarily until proper assistance is available.
Q: How do you fold (unlock) the knife in the kit? A: To fold and unlock the knife, turn the knife over with the blade portion facing towards you. You will see a serrated edge sticking up. Place your left hand on top of the blade (non-sharp edge) and push the little clip in until it is no longer blocking the blade. Then, push the blade towards the rear of the knife to fold it.
Q: Does the kit come with everything shown in the picture? A: Yes, the kit includes everything shown in the picture, providing you with a comprehensive set of tools and supplies.
Conclusion
In conclusion, the LUXMOM Emergency Survival Kit and First Aid Kit is a reliable and practical companion for outdoor enthusiasts and individuals preparing for emergencies. With its comprehensive range of tools, first aid supplies, and fishing tools, this kit offers peace of mind and ensures comprehensive protection in various outdoor activities and survival situations. While the size and durability of some items may be a concern for some users, the kit’s overall functionality, convenience, and positive user feedback make it a worthwhile investment. I highly recommend the LUXMOM Emergency Survival Kit and First Aid Kit for individuals who prioritize safety and preparedness during their outdoor adventures and for those seeking a thoughtful and useful gift option.
Pulled Pork Sandwiches Recipe


Ingredients:
- 1 pound of precooked pulled pork
- 1/4 cup of your favorite BBQ sauce
- 1/2 cup of coleslaw mix
- 2 sandwich buns
Instructions:
- Start by warming up the precooked pulled pork. You can do this in a pot over the campfire or on a portable camping stove. It should only take a few minutes until it’s heated through.
- While the pork is warming, you can get the rest of your ingredients ready. Get your buns out and open them up so they’re ready to go.
- Once the pork is warm, stir in the BBQ sauce. You can add more or less depending on your taste, but 1/4 cup should give you a nice, even coating.
- Now it’s time to assemble your sandwiches. Spoon an even amount of the pork mixture onto each bun. Then, top the pork with a generous helping of coleslaw mix.
- Your sandwiches are now ready to enjoy. The best part about this recipe is that you can wrap them up in foil and keep them warm on the edge of the campfire until you’re ready to eat. Enjoy!
Takki LED Camping Lantern: A Versatile Power Bank for Outdoor Adventures


Introduction
The LED Camping Lantern by Takki is a powerful and portable generator power bank that is perfect for outdoor enthusiasts and emergency situations. With its compact design and impressive features, this lantern offers both lighting and charging capabilities, making it an essential tool for camping, hiking, power outages, and other outdoor activities. In this review, we will discuss the product’s design and quality, its key features and functionality, a comparison with similar products, pros and cons, genuine user experiences and testimonials, tips and tricks for optimal usage, FAQs, and a conclusion with a recommendation for a specific audience.
Design and Quality
The Takki LED Camping Lantern is designed with portability and durability in mind. It weighs just 1.98lb and can easily fit into your backpack, making it convenient to carry during your outdoor adventures. The lantern is made of high-quality materials that ensure its longevity and resistance to wear and tear. The heat dissipation holes on the back of the lantern help to prevent overheating, and the safe battery management system provides protection against overload, over voltage, over current, over temperature, and short circuit.
Key Features and Functionality
This lantern boasts an impressive set of features that make it a versatile tool for outdoor enthusiasts. It is equipped with 84 bright LEDs that offer four lighting modes, allowing you to adjust the brightness up to 590 lumens. The four lighting modes can be easily switched by a short press, and a long press of about 3 seconds activates the SOS mode, which can be invaluable in emergency situations. Additionally, the lantern functions as a power bank with a 22500mAh rechargeable battery pack.
The power bank features one 80W (peak 120W) AC outlet, two 18W USB ports, and one 30W USB C port. These ports support fast charging for various devices such as laptops, cell phones, iPads, cameras, LED lights, speakers, and more. It can also serve as an emergency charging station for camping supplies within 80W. The lantern’s 22500mAh battery capacity ensures long-lasting power, with up to 94 hours of usage in power-saving mode, 13 hours in super bright mode, and 30 hours in other modes.
Comparison with Similar Products
Compared to similar products on the market, the Takki LED Camping Lantern stands out for its impressive combination of lighting power and charging capabilities. Many other camping lanterns offer basic lighting functionality but lack the ability to charge devices. The Takki lantern provides not only sufficient brightness but also a versatile power bank with multiple ports for charging various electronic devices. This dual-functionality makes it a practical and convenient choice for outdoor enthusiasts who value both lighting and charging capabilities in a single device.
Pros and Cons
Pros:
- Portable and lightweight design
- Four adjustable lighting modes with impressive brightness
- Versatile power bank functionality with multiple charging ports
- Long battery life for extended usage
- Durable construction and heat dissipation for safety
- Easy recharging through multiple modes (AC adapters, car chargers, solar panels)
Cons:
- Solar panel not included, requiring a separate purchase
- Limited power output (80W) may not be suitable for high-power devices
User Experiences and Testimonials
According to user reviews, the Takki LED Camping Lantern has received positive feedback for its performance and reliability. Users appreciate its compact size, lightweight design, and long battery life, which make it ideal for camping and emergency situations. The versatile charging capabilities have been praised, allowing users to power a variety of devices, including laptops, phones, and even small appliances. The brightness and adjustable lighting modes have also been commended, providing sufficient illumination for various activities in different settings.
Tips and Tricks for Optimal Usage
To get the most out of the Takki LED Camping Lantern, here are some tips and tricks:
- When using the AC charging port, make sure to turn on the AC button, indicated by a red light.
- Familiarize yourself with the different lighting modes and adjust the brightness according to your needs to conserve battery life.
- Consider purchasing a compatible solar panel (20-100W/18V) for convenient recharging in outdoor environments.
- Keep the lantern and its charging ports clean and free from debris to maintain optimal performance.
FAQ
Q: Can I use this lantern for a sleep apnea machine? How long would the charge last? A: The Takki LED Camping Lantern can power devices within 80W (peak 120W). Depending on the power requirements of your sleep apnea machine, it can be used for more than 2 hours. Please refer to the specifications of your device for accurate power consumption data.
Q: What devices can this camping lantern power? A: The camping lantern features one 110V/80W (peak 120W) AC outlet, two USB ports (18W QC3.0), and one USB C port (PD 30W). It can support fast charging for various devices such as laptops, cell phones, iPads, cameras, LED lights, speakers, camping fans, and more. It can also serve as an emergency charging station for camping supplies.
Q: Can I recharge this camping light with a home outlet? A: Yes, the portable power station with the camping light can be charged via AC adapters, car chargers, or solar panels (not included). You can recharge it anywhere, ensuring you have sufficient power without worrying about low battery capacity.
Q: Could this be used to plug in an air mattress? A: The Takki LED Camping Lantern can be compatible with devices up to 80W. It features an 80W AC outlet (110V, 120W Max) and a USB C port (PD 30W), along with two USB ports (18W QC3.0). It can power various devices, including air mattresses, depending on their power requirements.
Conclusion
In conclusion, the Takki LED Camping Lantern is an excellent choice for outdoor enthusiasts and emergency preparedness. Its combination of bright lighting, versatile charging capabilities, and portable design make it a valuable tool for camping, hiking, power outages, and other outdoor activities. Despite some limitations in power output and the need for a separate solar panel purchase, the lantern’s overall performance and positive user feedback make it a reliable and practical option. If you’re looking for a versatile power bank with reliable lighting for your outdoor adventures, the Takki LED Camping Lantern is highly recommended. Check it out here on Amazon.
Veggie Hummus Sandwich Recipe


Ingredients:
- 4 slices of whole grain bread
- 4 tablespoons of hummus (you may want to add more to taste)
- 1 medium cucumber, sliced
- 1 medium bell pepper, sliced
- 4 lettuce leaves
Instructions:
- Begin by spreading a tablespoon of hummus onto one side of each slice of bread.
- On two of the slices, evenly distribute the cucumber and bell pepper slices.
- Top each slice with two lettuce leaves.
- Complete the sandwiches with the remaining slices of bread, hummus side down.
- Cut each sandwich in half if desired, and serve immediately. Enjoy your delicious and healthy Veggie Hummus Sandwich!
VINGLI 6.7FT Shower Tent: Product Review


The VINGLI6.7FT Shower Tent is a multi-purpose outdoor accessory designed to meet your privacy needs in the great outdoors. This innovative product offers a convenient changing room, shower space, or portable toilet – perfect for camping, boating, or any outdoor activity that calls for privacy.
Design and Quality
At first glance, you’ll appreciate the smart, functional design of the VINGLI Shower Tent. The silver-coated fabric ensures privacy, even in full daylight, while the mesh side windows provide ventilation. With its fiberglass poles, the tent is sturdy, yet lightweight enough to carry easily, especially when stored in the included carrying bag.
The floor of the tent is constructed with mesh, an upgrade from standard oxford flooring, providing excellent drainage. The overall quality of the tent is impressive, boasting waterproof top cloth to keep you dry, even during showers.
Features and Functionality
The VINGLI Shower Tent offers a range of features that sets it apart from similar products on the market. One of the standout features is its spaciousness. At 6.7 feet in height and with a 61 x 61-inch footprint, this tent offers enough room to comfortably stand, move around, and even lie down.
Another major selling point of this tent is its ease of use. With its easy-setup design, you can have your private tent ready in a jiffy. And if you get stuck, there are clear manuals and videos to help you along the way.
The tent also comes equipped with two storage pockets and a clothesline for additional convenience. One pocket is located inside, while the other is outside, perfect for separating your wet and dry items.
Comparison with Similar Products
Compared to similar products, the VINGLI Shower Tent stands out in terms of size, features, and ease of use. While many other shower tents offer a smaller, more cramped space, this tent provides a spacious interior, making it a more comfortable choice.
In terms of features, the built-in storage pockets and clothesline set this tent apart from its competitors, providing practicality and convenience. Moreover, its ease of setup outperforms many other similar products, which can be tricky to assemble.
Pros and Cons
Pros
- Spacious and well-ventilated interior
- Easy to set up and pack away
- Waterproof and sturdy design
- Built-in storage pockets and clothesline
Cons
- The floor cannot be removed
- Not capable of holding a full 5-gallon water bag
Why is this product better?
The VINGLI Shower Tent shines due to its spacious interior, easy setup, and well-thought-out design. It offers superior ventilation and storage options, along with a strong, waterproof design that makes it a reliable choice for outdoor activities. While other tents may struggle with setup or offer cramped spaces, the VINGLI Shower Tent avoids these issues, providing a superior user experience.
User Experiences and Testimonials
Numerous online reviews highlight the practicality and usefulness of the VINGLI Shower Tent. Users love its spaciousness and ventilation, which allows for a more comfortable and enjoyable outdoor experience. Although some users have pointed out that the tent cannot hold a full 5-gallon water bag, they appreciate its sturdiness and other features.
Tips and Tricks
To get the most out of your VINGLI Shower Tent, make sure to take advantage of the built-in storage pockets and clothesline. These features can help you keep your belongings dry and organized. Furthermore, remember to stake down the tent properly to ensure its stability.
Frequently Asked Questions
Q: Can the floor be removed? A: No,the floor cannot be removed in this model. It is a mesh floor that allows for water drainage.
Q: Can it hold a full 5-gallon water bag? A: No, the VINGLI Shower Tent is not capable of holding a full 5-gallon water bag. It is recommended to use a smaller water bag for showering purposes.
Q: Is it easy to assemble? A: Yes, users have mentioned that the VINGLI Shower Tent is quite easy to assemble, and clear instructions are provided.
Q: Is it waterproof? A: Yes, the tent is made of waterproof material. The roof cloth is particularly designed to keep you dry during showers.
Conclusion
The VINGLI 6.7FT Shower Tent is a valuable accessory for any outdoor activity requiring privacy. Its practical design, spacious interior, and convenient features offer comfort and convenience in a compact and portable package. Despite minor drawbacks, such as the inability to hold a full 5-gallon water bag, it remains a reliable and top-quality choice among outdoor shower tents. Check it out on Amazon here.
Augtarlion Aluminum Telescoping Ladder Review


Hello there! Today, I’ll be reviewing the Augtarlion Aluminum Telescoping Ladder, a versatile piece of equipment that has become an integral part of my toolkit. Let’s dive into the details!
Introduction and Key Features
The Augtarlion Aluminum Telescoping Ladder is a 10.5 feet collapsible extension ladder equipped with a locking mechanism. It’s ideal for home use or outdoor work and has a heavy-duty weight capacity of 330lbs. Crafted from premium 6061 thick aluminum alloy, the ladder is incredibly durable and can withstand the test of time. With a compact size and adjustable height, this ladder proves to be very practical, especially for those hard-to-reach areas.
Design and Quality
The quality of the Augtarlion ladder is evident right from the start. The aluminum alloy material is not only sturdy but also resistant to rust and corrosion, prolonging the lifespan of the ladder. Each step falls slowly and smoothly when retracting, preventing any hand-pinching accidents. The nylon fiber-reinforced plastic parts further enhance the ladder’s load capacity.
The design of this ladder is quite thoughtful. It can compact from 2.6Ft to 10.5Ft, and when not in use, it can be folded to save space. There’s an integrated carrying handle and a heavy-duty velcro storage strap, making transportation and storage a breeze.
In-Depth Analysis
What sets this ladder apart is its intelligent locking mechanism, which ensures safety at every step. This feature is handy, especially when you’re working alone. The adjustable height is another standout feature – whether you’re painting a high wall or reaching the top shelf in a cabinet, this ladder can adjust to your needs.
One important aspect to note is the ladder’s multi-purpose use. It’s a fantastic tool for household chores, professional work, window washing, interior or exterior decorating, roof repairs, and even tree climbing. The possibilities are endless!
Comparison with Similar Products
When comparing the Augtarlion ladder with similar products, it’s clear to see that this ladder’s design, safety features, and durability put it a notch above the rest. While other ladders may boast similar functionalities, they often fall short when it comes to build quality and stability. The Augtarlion ladder, with its robust build and thoughtful design, definitely stands out.
Pros and Cons
Pros:
- Durable and sturdy aluminum alloy material
- Intelligent locking mechanism for safety
- Compact design for easy storage and transportation
- Versatile use
- Excellent load capacity
Cons:
- The retracting process may take some time to get used to
- Rubber feet might crack over time
User Experiences and Testimonials
Most users praise the Augtarlion ladder for its easy maneuverability, particularly for women, as one reviewer pointed out. Many love how compact it is, making storage simple, and appreciate its sturdy and reliable construction. Some users even received two ladders for the price of one, which was a welcome surprise! However, a few users experienced cracking in the rubber feet and wished the ladder had a soft-close feature. Despite this, the majority of users were happy with their purchase and found it to be a valuable addition to their toolkit.
Tips and Tricks
To maximize the lifespan and usability of your Augtarlion ladder, remember to retract it slowly to avoid pinching your hands. Always ensure that the locking indicators at each step are showing a secure status before climbing. When storing, it’s best to keep the ladder in a dry and shaded place to prevent damage from weather elements.
FAQs
Q: How much does the ladder weigh? A: The ladder weighs approximately 25 pounds
Q: Can this ladder retract upwards, for example, if used for a pull-down attic access? A: While this concept sounds neat, it isn’t practically applicable. Each rung of the ladder has locking tabs that need to be pressed to retract it. Unless you can reach the upper lock-tabs to release them, you can’t retract the ladder.
Q: Where is the ladder made? A: The ladder is made in China.
Q: How thick is the ladder when collapsed? A: The ladder is about 2 to 3 inches thick when fully collapsed.
Q: Does this ladder come with a carrying case? A: No, it doesn’t come with a carrying case. However, it comes with a closure strap and anti-skid handle for easy carrying and storage.
Q: What’s the maximum weight the ladder can support? A: The ladder can support a maximum weight of 330lbs.
Q: How can the ladder be shortened without collapsing it entirely? A: To shorten the ladder, press both release buttons and start bringing the ladder down. When you reach the desired height, grab the bottom of the rung in the center to stop it. Give it a slight push upward, and you will hear and feel it locking into place.
Conclusion
In conclusion, the Augtarlion Aluminum Telescoping Ladder is a solid, well-built, and versatile tool perfect for both professional and personal use. Its thoughtful design, sturdy construction, and impressive safety features make it stand out from the competition. Despite minor drawbacks such as potential wear on the rubber feet, this ladder is a great investment. Whether you’re a DIY enthusiast, a professional contractor, or simply someone looking for a reliable ladder for household tasks, the Augtarlion ladder could be just what you need! This ladder can be found here at Amazon.
Overcoming Challenges of RV Living: Practicalities of the Full-Time RV Life
Howdy! Living in an RV full-time, while brimming with adventure, comes with its fair share of challenges. Think of it as a charming, constantly moving jigsaw puzzle. Let’s explore some potential road bumps you might encounter in your RV life and share practical tips to navigate them smoothly.
Lack of Personal Space
Embracing the RV lifestyle often means trading sprawling space for the freedom of the open road. But let’s face it, even the largest RV can feel a bit tight, especially when you’re just starting out on this journey. The lack of personal space is one of the prominent challenges of RV living. Every inch matters, and there are days when you might wish for a little more elbow room or a bit more privacy.
However, the key to comfortable RV living lies in how well you utilize the available space. Smart storage solutions are your best friends here. Opt for furniture that doubles up as storage or can be folded away when not in use. For example, a bed with storage compartments underneath or a table that folds back into the wall can help maximize the living space.
Furthermore, keeping your living area organized is crucial. The more clutter-free your RV, the more spacious it will feel. A place for everything and everything in its place is a good mantra to follow. Invest in organizers, use the vertical space efficiently with wall-mounted holders, and regularly declutter to keep only the essentials.
Creating separate zones in your RV can also help make the space feel larger and cater to your need for personal space. Even if the boundaries are symbolic, designating specific areas for sleeping, dining, or working can provide a sense of order and personal space.
Lastly, remember to make the most of the outdoors. One of the biggest benefits of RV living is that your backyard can be a beach, a forest, or a mountain range. When the weather is good, take activities like dining or reading outside. This can help alleviate feelings of being confined and remind you why the call of the open road is worth answering.
Living in an RV may test your adaptability, but with a little creativity and a lot of patience, you’ll find ways to make your RV a cozy, comfortable home on wheels.
Managing Utilities
In the comfort of a traditional home, it’s easy to take utilities for granted. Turn on a faucet, and there’s water. Flip a switch, and you have light. But in an RV, managing utilities is a hands-on affair and definitely a crucial aspect of road living. Here, you’ll be dealing with your own power, water, and waste systems, and it can sometimes feel like a balancing act.
When it comes to power, most RVs are equipped with a battery system, and depending on your usage, you might find yourself running low quite frequently. The solution? Be mindful of your energy consumption. Turn off lights and appliances when not in use. Consider investing in energy-efficient appliances or even look into solar panels for a sustainable source of energy. If you’re frequently at RV parks or campgrounds, utilizing their electricity can be an option, but having a plan for off-grid living is crucial.
Water is another precious resource in RV life. You’re usually working with a limited supply, stored in your freshwater tank. Conserving water can become second nature after a while. Simple changes like taking short showers, turning off the tap while brushing your teeth, and using biodegradable, water-saving soaps can make a huge difference.
Finally, let’s talk about waste. Your RV has a gray water tank for used water from sinks and showers, and a black water tank for toilet waste. These tanks need to be emptied regularly, and this is one chore that is essential to master. Many campgrounds offer dump stations for this purpose. Make sure to use proper RV-friendly toilet chemicals and tissue to prevent clogging and odor issues.
Overall, managing your RV utilities requires a keen awareness of your consumption and the ability to adapt to more conservative usage practices. It’s all part of the adventure, and it offers an excellent opportunity to understand and reduce our impact on the environment. Remember, it’s all about adaptability and conservation when it comes to RV living.
Limited Access to Healthcare
One challenge that often surfaces when living the RV lifestyle is ensuring consistent access to healthcare. Unlike a stationary life where your trusted doctor is just a call away, life on the road often means new locations and unfamiliar medical facilities. However, don’t let this deter you. With the right planning and adaptability, it’s entirely possible to maintain good health and handle emergencies effectively while traveling.
The first step towards managing healthcare on the road is a preventative one – maintaining a healthy lifestyle. Regular exercise, a balanced diet, and getting enough rest can do wonders for your overall health. Regular health checks before setting off on long travels also help identify any potential issues early on.
When it comes to prescription medications, planning is essential. Ensure that you have an ample supply before you embark on your journey. Speak with your doctor about your travel plans, they can often provide extended prescriptions. Mail-order pharmacies are also a great resource, as they can ship your medications to your current location or a nearby pharmacy.
Emergencies can happen, and they’re even more stressful when you’re far from home. It’s beneficial to learn basic first aid and CPR techniques, and always keep a well-stocked first aid kit in your RV. Research the locations of hospitals and urgent care facilities in the areas you’ll be traveling through and keep this information handy.
Telemedicine has become a boon for nomadic life. Many healthcare providers now offer virtual visits, allowing you to consult with a healthcare professional over a video call. This convenience can be an excellent option for minor ailments and concerns.
Investing in a good health insurance plan that covers you across state lines is another crucial aspect. Some travelers even consider medical evacuation insurance, which covers the cost of transporting you to a hospital in case of a serious illness or injury.
Remember, ensuring access to healthcare while living on the road is more about anticipation and preparation. Stay proactive about your health, know your options, and you’ll find the open road can be just as accommodating to your healthcare needs as a stationary home.
Internet Connectivity
In the digital age we live in, having a reliable internet connection is no longer a luxury; it’s a necessity. This reality becomes particularly crucial when living the RV lifestyle. Whether you’re working from the road, staying connected with loved ones, streaming entertainment, or simply mapping out your next destination, a steady internet connection is vital.
However, maintaining consistent internet connectivity in an RV can come with its own unique set of challenges. As you travel through various regions, you may encounter areas with weak or non-existent cell service, making your regular mobile data connection unreliable. Campground Wi-Fi, where available, often struggles with slow speeds due to high usage or outdated infrastructure.
Despite these challenges, there are several ways to ensure you stay connected on the road. One of the most reliable solutions is to invest in a portable Wi-Fi device or a mobile hotspot. These handy devices create a personal Wi-Fi network by using mobile data, providing a stronger and more stable connection than your smartphone might.
If you’re frequently in areas with weak cell service, consider a cellular signal booster. These devices amplify the existing cell signal, improving your mobile data connection. There are many models available, some designed specifically for RV use.
Another option to consider is satellite internet. While traditionally more expensive and slower than other internet options, recent advances have made satellite internet faster and more affordable. It can be an excellent option for those who venture off the beaten path into more remote areas.
Also, don’t forget about public Wi-Fi. Many libraries, coffee shops, and even some large retail stores offer free Wi-Fi. While public Wi-Fi should not be your primary internet solution due to security concerns, it can provide a temporary connection when needed.
The key to staying connected on the road is flexibility and redundancy. Having multiple internet options at your disposal will ensure that you can get online when you need to. With the right setup, the internet can be just as accessible on the road as it is in a traditional home. So, get connected and share your adventures with the world!
Vehicle Breakdowns and Maintenance
An RV is more than just a vehicle; it’s your home on wheels. The last thing you want while exploring the open road is to be sidetracked by mechanical issues or worse, a breakdown. This can be a significant concern, especially if you’re in a remote area or unfamiliar territory. It’s not just inconvenient, it can also put a dent in your travel budget, and disrupt your travel plans significantly.
The key to avoiding such frustrating situations is preventive maintenance. Regularly checking your RV’s crucial systems, such as the engine, brakes, tires, and electrical systems, can help you catch small problems before they become major issues. This includes routine oil changes, checking tire pressure, and ensuring your brakes are functioning properly. Remember, an ounce of prevention is worth a pound of cure!
But, despite the best preventative measures, it’s important to accept that breakdowns can and do happen, often when you least expect them. Therefore, having a plan in case of a breakdown is essential. This might include having a roadside assistance plan that covers RV towing, which is often different and more expensive than standard car towing.
You should also have a basic understanding of your RV’s mechanical systems to troubleshoot minor issues on your own. There are numerous resources available, both online and in print, to increase your mechanical knowledge. You might also consider carrying a selection of tools and spare parts, such as fuses, light bulbs, and fan belts, that might be needed for small repairs.
Additionally, know where to find professional help when you need it. There are apps and websites that can help you locate the nearest RV repair center, and it’s a good idea to have these on hand before you need them.
Experiencing a breakdown can be a challenging aspect of RV living, but with preventive maintenance and a well-prepared plan, you can navigate these obstacles and continue enjoying your adventures on the road. After all, overcoming challenges is part of the journey and the stories you’ll tell later!
Weather Considerations
Weather plays a significant role in the RV lifestyle. It’s not just about the destination; it’s also about the journey, and the weather can greatly impact both. Sunny days make for lovely drives and outdoor activities, while a rainstorm might have you cozying up inside with a good book. However, severe weather conditions like snowstorms, heatwaves, or high winds can pose serious challenges to RV living.
Planning is crucial when it comes to weather. Before setting off on any trip, make sure to check the forecast for your route and your destination. Thanks to modern technology, there are numerous apps and websites that provide accurate and timely weather updates and alerts. Having this information can help you avoid dangerous weather conditions and plan your travels accordingly.
Despite careful planning, you may still find yourself caught in less-than-ideal weather. In these instances, understanding how to adapt to various weather conditions is essential. For instance, in high heat, make sure your RV’s air conditioning is functioning properly, and consider investing in window coverings to keep the sun out. In cold weather, properly insulate your RV, ensure your heating system is up to the task, and protect your water system from freezing.
Driving in adverse weather conditions, like heavy rain, snow, or high winds, requires extra caution. It’s essential to know your limits and the limits of your RV. If the weather is making driving unsafe, don’t hesitate to pull over and wait it out. Remember, safety should always be your top priority.
Additionally, remember that weather conditions can affect your RV’s maintenance needs. For instance, harsh sun can cause damage to your RV’s exterior, while cold temperatures can affect your battery performance. Make sure you’re aware of these effects and take the necessary steps to protect your vehicle.
Weather considerations might seem like a lot to manage, but with careful planning and preparedness, you can comfortably live the RV life in nearly any weather conditions. After all, some of the best memories can come from waking up to a fresh snowfall, watching a thunderstorm from the safety of your RV, or enjoying a breezy summer evening by the campfire.
Narrow Parking and Maneuvering Options
Parking and maneuvering a sizable vehicle like an RV can be a significant challenge, especially for beginners. Unlike a typical car, RVs require larger spaces, have wider turning radii, and may not fit in standard parking lots or driveways. This means you’ll often need to find specialized parking spaces, and in some cases, you might need to park some distance away from your actual destination. Plus, reversing and navigating through narrow roads or busy campgrounds can be a nerve-wracking experience.
The first thing to remember is that practice makes perfect. Spend time getting to know your RV’s dimensions and handling characteristics. Practice driving, parking, and reversing in a large, empty parking lot before hitting the road. Over time, you’ll become more comfortable and confident in maneuvering your RV.
Patience is also key. Never rush parking or maneuvering. Take your time, even if it means you’re holding up traffic for a little while. It’s better to go slow and park safely than to rush and potentially damage your RV or another vehicle.
Planning ahead is crucial when it comes to parking. Research your route and destination in advance to make sure they are RV-friendly. There are numerous resources available, including apps and websites that list RV-friendly parking spots and campgrounds. These resources often include reviews from other RVers, which can provide invaluable insight and tips.
In many urban areas, parking can be particularly tricky. If you’re planning to visit a city, consider finding a campground on the outskirts and using public transportation or a smaller vehicle to go into the city.
Lastly, investing in tools such as a backup camera and parking sensors can make a significant difference in easing the parking and maneuvering process. These devices give you a better view of what’s behind you and alert you to any obstacles, reducing the risk of any accidental bumps or scrapes.
While parking and maneuvering an RV can initially seem daunting, with practice, planning, and the right tools, you’ll soon master the art of navigating your home on wheels.
Lack of Privacy
One aspect of RV life that can be a bit of a surprise, especially for newcomers, is the potential lack of privacy. In the confines of an RV, personal space can be limited, particularly if you’re traveling with a family or group. This can make it challenging to find alone time or a quiet moment to yourself. Furthermore, when you’re parked in a campground or RV park, you’re often sharing a fairly small space with other travelers. It’s not uncommon for RVs to be parked close together, with only a small buffer of space in between. This proximity means you’re likely to see, and possibly hear, your neighbors quite regularly.
Creating a sense of privacy in such close quarters requires a bit of creativity and adaptability. Inside your RV, consider designating certain areas as private spaces where members of your group can retreat for some quiet time. This could be as simple as a curtain hung around a bunk or a specific seat designated as a quiet zone during certain times of the day. Noise-canceling headphones can also be a boon when you want to tune out the rest of the world.
Outdoors, consider setting up a privacy screen or using your awning to create a private area. Small folding screens or outdoor curtains can provide a visual barrier between you and your neighbors. Just be sure to respect campground rules regarding structures and enclosures.
Another key aspect of privacy is the mutual respect between you and your neighbors. Keep noise levels reasonable, especially early in the morning or late at night. If you’re camping with pets or children, ensure they respect the space of others as well.
Online, you might want to be cautious about how much detail you share regarding your location and travel plans, for both privacy and security reasons. It’s fine to share your experiences and photos, but consider doing so after you’ve left a location, especially if you’re traveling alone or in less crowded areas.
With a bit of planning and consideration, you can maintain a level of privacy that makes your RV feel like a sanctuary, even when you’re parked in a bustling campground. The RV lifestyle is a community, but that doesn’t mean you can’t enjoy your own private corner of it.
Maintaining Relationships
One of the biggest challenges when living on the road full-time is maintaining relationships with friends and family. It’s not always easy to keep in touch when you’re constantly on the move, and time differences can also add an extra layer of complication. Plus, there’s the fact that you’re not physically there for birthdays, holidays, and other special events. It’s a common misconception that living on the road can lead to isolation, but with some effort and flexibility, you can maintain and even strengthen your relationships.
Firstly, modern technology is a boon for keeping in touch. From video calls to instant messaging, social media to emails, there are countless ways to stay connected. Regularly scheduling calls or video chats with loved ones can provide a sense of stability and connection. Apps like Skype, Zoom, or FaceTime make it possible to see each other’s faces, which can help to make conversations more personal.
Secondly, remember that old-school communication methods still hold their charm. Postcards, letters, and care packages can be a fun way to share your adventures and let people know you’re thinking of them. Plus, who doesn’t love receiving snail mail?
Thirdly, plan for visits. Just because you’re on the road doesn’t mean you can’t spend quality time with your loved ones. You can arrange to meet up with friends and family at various points along your journey. Invite them to join you on the road for a week or two, or plan your route to pass by their homes. This gives you something to look forward to and allows you to create shared memories.
Lastly, make an effort to form new relationships on the road. The RV community is known for its friendliness and camaraderie. Join local groups, attend RV rallies, or get involved in online RV communities. These interactions can lead to lasting friendships with people who truly understand your lifestyle.
Remember, maintaining relationships while living on the road requires effort, but the rewards are well worth it. No matter where your travels take you, staying connected with loved ones can provide a sense of home and community that is incredibly enriching.
Got any tips or stories of your own? Or perhaps some questions? Feel free to share in
Campfire Pizza

 Ingredients:
- 1 small pizza dough (about 8 oz or half a pound)
- 1/2 cup pizza sauce
- 1 to 1.5 cups shredded mozzarella cheese
- Your favorite pizza toppings, as needed (sliced pepperoni, bell peppers, onions, olives, mushrooms, etc.)
Instructions:
- On a clean and lightly floured surface, roll out the pizza dough into a round shape, about 1/4 inch thick.
- Lay the rolled out dough onto a campfire-safe pan or a piece of heavy-duty aluminum foil.
- Spread the pizza sauce evenly onto the dough, leaving a small edge for the crust.
- Sprinkle the shredded mozzarella cheese over the sauce.
- Add your chosen toppings. Be careful not to overload the pizza, as it may take longer to cook.
- Place the pan or foil on a grill rack over the campfire, but not directly on the flames. Cover with another pan or foil to create a makeshift oven.
- Cook for about 15-20 minutes, checking frequently, until the crust is golden and the cheese is melted and slightly bubbly.
- Remove the pizza carefully from the fire, let it cool for a few minutes, then slice and serve.
Remember, campfire cooking times can vary depending on the heat of your fire and the distance of the food from the flames, so always keep a close eye on your pizza to avoid burning.