
Tracy
Granola and Yogurt Parfait

 Ingredients:
- 2 cups of your favorite granola
- 2 cups Greek yogurt
- 1 cup fresh berries (strawberries, blueberries, raspberries, etc.)
Instructions:
- Grab two cups or glasses. Layer 1/4 cup of granola at the bottom of each cup.
- Add 1/4 cup of Greek yogurt on top of the granola in each cup.
- Layer 1/8 cup of fresh berries on top of the yogurt.
- Repeat these layers until the cups are filled, finishing with a layer of berries on top.
- Serve immediately, or refrigerate for up to 2 hours before serving.
FireHiking Titanium Stove: An Honest Review

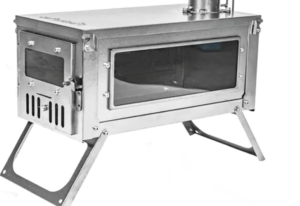 Camping, backpacking, or hunting, the need for a reliable, compact, and lightweight stove is a crucial part of our gear list. That’s where the FireHiking Titanium Stove comes into play. With its unique features like portability, rust and corrosion-resistant titanium construction, and foldable design, it becomes an attractive choice for outdoor enthusiasts. But how does it hold up in practice? Let’s dive into a comprehensive review of this product.
Design and Quality
With its emphasis on portability, the FireHiking Titanium Stove features a foldable design that reduces its size considerably, making it an ideal choice for backpacking. This compact stove, weighing only 3.4lb, can easily be stowed away in your backpack.
The quality of the material is another strong suit of this stove. Constructed with titanium, this stove boasts high strength, excellent heat resistance, and immunity to rust and corrosion. Additionally, it features a glass window for observing fuel combustion and conveniently adding fuel when needed.
Key Features and Functionality
The FireHiking Titanium Stove truly stands out with its clever design and unique features:
- Portability: With its foldable design, this stove minimizes space usage, which is essential when packing for a trip.
- Durability: Made of titanium, it’s built to withstand harsh conditions and high temperatures.
- User-friendly Design: The transparent glass window lets you keep an eye on the fuel combustion and helps you gauge when you need to refuel.
Comparison with Similar Products
Compared to other portable stoves on the market, the FireHiking Titanium Stove comes out on top with its unique blend of portability, functionality, and durability. While other stoves might be lighter or smaller, they often compromise on durability or ease of use, something this stove seems to balance exceptionally well.
Pros and Cons
Pros:
- Compact and portable
- Durable and heat-resistant titanium construction
- User-friendly design with a transparent window
Cons:
- The stove pipe might be a bit tricky to roll out
- No connectors or rope provided for guying out the spark arrestor
User Experiences
The FireHiking Titanium Stove has received overwhelmingly positive reviews from users. Most customers appreciated its heat output, stating it warms up their tents effectively. Some users have expressed minor concerns about the stove pipe and the spark arrestor, but these do not overshadow the product’s overall positive feedback.
Tips and Tricks
For optimal usage of your FireHiking Titanium Stove, consider the following tips:
- Use a piece of pipe to roll out the stove pipe before usage. It helps the pipe to look less crinkly.
- For guying out the chimney, you can use key loops or metal cable attached to the top ring below the cap.
FAQs
- What side is the window on?
- The window panels are interchangeable. You can set up the glass on either the right or left side.
- In what country is the stove made?
- The product is believed to be made in Thailand, as per the information on the packaging.
Conclusion
In conclusion, the FireHiking Titanium Stove stands as a fantastic choice for those seeking a portable, durable, and efficient stove for their outdoor adventures. Despite a few minor hiccups, the stove’s performance, design, and user-friendly features make it a product worthy of consideration for your next trip. Whether you’re an occasional camper or an experienced backpacker, this stove is likely to cater to your needs effectively. Click here to check the stove out on Amazon.
The Art of Cooking on the Road: RV and Van Life Recipes

Hello fellow travelers! Cooking on the road can be a fun and creative challenge. Between the minimal storage space, limited resources, and unpredictable conditions, it may seem daunting at first. But fear not, with a little planning and some clever recipes, you can whip up delicious, nutritious meals in no time. In this article, I’ll share with you my favorite van life recipes for breakfast, lunch, and dinner.
Understanding Your Cooking Space
Before we jump into the recipes, it’s important to understand your cooking space. Most vans and RVs are equipped with a basic cooking facility, like a gas stove or electric burner. Some might even have a microwave or an oven. Space is usually at a premium, so organization and efficiency are key. Prioritize versatile cookware and utensils, and learn to love one-pot meals – they’ll be your best friend!
Planning and Preparing Meals
One of the best tips for van life cooking is to plan your meals in advance. This doesn’t mean you can’t be spontaneous, but knowing roughly what you’ll be eating for the next few days will make grocery shopping and food storage much easier. Consider preparing some meals in advance and utilizing leftovers to maximize your food and minimize waste.
Simple, Nutritious Recipes for the Road
Let’s dive into some delicious, easy-to-make recipes perfect for van life. Whether you’re a fan of hearty breakfasts, light lunches, or satisfying dinners, I’ve got you covered. These recipes have minimal ingredients, require little preparation, and are designed to be cooked with limited resources. Plus, they’re healthy and packed with the nutrients you’ll need for your adventurous lifestyle.
Breakfast Recipes
Start your day off right with these filling and nutritious breakfast options:
- Overnight Oats: This is a no-cook, prepare-ahead recipe that’s perfect for early mornings. Just mix the oats, milk, Greek yogurt, and honey in a jar, top with your favorite fruits and nuts, and let it sit in the fridge overnight.
- Campfire Breakfast Burritos: Cook scrambled eggs and sausage or bacon on your stove or campfire, wrap it up in a warm tortilla, and voila – a handheld breakfast that’s perfect for on-the-go.
- Banana Pancakes: These 3-ingredient pancakes are both simple and satisfying. All you need are bananas, eggs, and a bit of flour. Plus, they can be customized with add-ons like chocolate chips or blueberries.
For the complete breakfast recipes and more, click here.
Lunch Recipes
When it comes to lunch on the road, we want something quick, easy, and light. Here are a few options:
- Chicken and Veggie Foil Packets: This recipe is simple, nutritious, and requires minimal cleanup. Just place your chicken and veggies on a foil, season, and let it cook on the campfire or stove.
- Tuna Salad Wraps: A classic, easy lunch option. Mix canned tuna with mayonnaise and celery, spread it on a tortilla, add some lettuce, and roll it up.
- Caprese Skewers: An Italian classic turned road-friendly. Just thread a cherry tomato, a mozzarella ball, and a fresh basil leaf onto a skewer. Drizzle with olive oil and balsamic glaze before serving.
For the complete recipes and more, click here.
Dinner Recipes
After a long day of adventure, you’ll want a comforting and filling meal. Here are some dinner recipes you can try:
- One-Pot Pasta: Minimal cleanup and maximal flavor, this recipe is a van life staple. You only need pasta, tomato sauce, garlic, olive oil, and your preferred Italian seasoning. Sauté the garlic, add pasta, sauce, and water, then let it cook until the pasta is tender.
- Campfire Chili: Hearty and warming, this chili is perfect for cooler nights. Cook your choice of ground meat with onions and garlic, add beans, tomatoes, and spices, then let it simmer until heated through.
- Fish Tacos: This simple and fresh recipe requires flaked grilled fish, coleslaw mix, tartar sauce, and tortillas. Pile everything on a tortilla and enjoy.
For the complete recipes and more, click here.
Snack Recipes for the Road
Every road tripper knows the importance of a good snack stash. It keeps the hunger at bay and fuels your adventures. Here, let’s dive into some simple and tasty snack recipes that you can prepare in your van or RV.
Firstly, let’s talk about the all-time favorite, Trail Mix. This one is super customizable. Combine your favorite nuts, seeds, dried fruit, and a bit of something sweet like dark chocolate chunks. You could even toss in some coconut flakes or popcorn. Just mix it all together, and you’ve got yourself a protein-packed snack that’s ready to go.
Fresh fruit is another fantastic road trip snack. It’s as easy as washing and packing a bunch of apples, bananas, or oranges. You could even kick things up a notch and create a fresh fruit salad. Just chop up your favorite fruits and mix them in a container. Add a squeeze of lemon juice to keep the fruit from browning, and you’re set.
Cheese and Crackers is a classic that never gets old. Grab some whole grain crackers and pair them with pre-sliced cheese. Experiment with different types of cheese, like cheddar, gouda, or even brie. For a little extra flavor, add a slice of cured meat or a dollop of jam.
Hummus and Veggies is a snack that’s as nutritious as it is delicious. Just cut up some bell peppers, cucumbers, and cherry tomatoes, then dip them in your favorite hummus. You could even make your own hummus by blending canned chickpeas, olive oil, tahini, lemon juice, and garlic.
Yogurt and Granola is a lovely combination of creamy and crunchy. Fill a jar with your favorite yogurt, then add a layer of granola on top. You could even add some fresh fruit or a drizzle of honey for a touch of sweetness.
Jerky is a snack that packs a protein punch. If you’re feeling adventurous, you could make your own by marinating lean meat in your favorite flavors and drying it in a low oven or dehydrator. Alternatively, look for brands with low sugar and sodium content.
Last but certainly not least, is Popcorn. You could pop a bag before you hit the road or, if you have a stove in your van or RV, make it fresh whenever you want. Just heat some popcorn kernels in a bit of oil, put a lid on it, and wait for the magic to happen. For added flavor, toss the popcorn in a mix of spices, like chili powder and nutritional yeast.
Each of these recipes can be prepared ahead of your journey, so you’ll always have tasty snacks at hand. With these in your snack arsenal, you’ll be ready for the road in no time! Enjoy the van life, full and satisfied!
Check out the snack recipes here.
Cooking with Limited Resources
When you’re living the van life, you often have limited resources, like water and power. This means it’s important to find ways to cook efficiently. One-pot meals, like the one-pot pasta or campfire chili mentioned above, are a great way to minimize cleanup. Also, consider no-cook options, like the overnight oats or tuna salad wraps.
Food Storage and Preservation
Proper food storage is crucial when you’re on the road. For refrigerated items, a cooler or a small fridge can work wonders. For non-refrigerated items, ensure they’re stored in a cool, dry place. And remember, many fresh ingredients, like fruits, vegetables, and certain dairy products, can last a few days without refrigeration if they’re stored properly.
Dining Out vs. Cooking In
While it can be tempting to eat out all the time, cooking in your van or RV can save you money and is often healthier. But don’t deny yourself the pleasure of trying local cuisine! Striking a balance between dining out and cooking in can enrich your travel experience while keeping you on a budget.
Kitchen Tools and Gadgets
While it’s important to keep things minimal when you’re living on the road, there are certain kitchen tools and gadgets that can make your life much easier. Here’s a shortlist:
- Portable Stove or Cooker: A portable stove will provide you with a reliable heat source for cooking.
- Cooler or Mini Fridge: For keeping perishable food items fresh.
- Multi-purpose Utensils: Look for utensils that can perform multiple tasks to save space and simplify cooking.
- Compact Cutting Board: A small, durable cutting board is a must-have for food preparation.
- Collapsible Containers: They’re great for storing food or leftovers and they take up less space when not in use.
Conclusion
Cooking on the road doesn’t have to be a chore. In fact, it can be a fun and rewarding part of your van life experience. With a bit of planning and the right recipes, you’ll be whipping up delicious meals wherever your travels take you.
I encourage you to share your own on-the-road recipes and cooking tips. Your input can provide other readers with new ideas and help build our community of road warriors!
FAQ
Q: How do I store food without refrigeration? A: Choose foods that have a longer shelf life, like canned goods, rice, pasta, and certain fruits and vegetables. Store them in a cool, dry place.
Q: Can I cook over an open fire? A: Absolutely! Just make sure it’s permitted and safe in your current location. Always practice fire safety.
Q: What’s the best way to clean dishes on the road? A: Use biodegradable soap and a small basin to wash dishes. Always dispose of your water well away from natural water sources.
Call to Action
Lastly, if you found this article useful, feel free to share it with other van life enthusiasts. Let’s spread the love for food and adventure!
Bon appétit and happy travels!
This article was written with the hope to guide you through your culinary journey during your van life experience. The recipes are simple, nutritious, and perfect for a life on the road. The dishes range from hearty breakfast burritos to comforting one-pot pasta and are sure to please. With the right recipes, cooking on the road becomes an adventure in itself!
Banana Pancakes


Ingredients:
- 2 ripe bananas
- 4 large eggs
- 2 tablespoons all-purpose flour
Instructions:
- In a bowl, start by peeling and mashing the two ripe bananas until no large chunks remain.
- Crack four large eggs into the bowl and whisk them together with the mashed bananas until well combined.
- Stir in two tablespoons of all-purpose flour to the banana and egg mixture. This step is optional, but it helps create a more traditional pancake texture. If you prefer, you can leave the flour out for gluten-free pancakes.
- Heat a non-stick skillet or griddle over medium heat. Once hot, drop 1/4 cup of the pancake batter onto the griddle for each pancake.
- Cook until the edges look set and bubbles form on the surface, about 2-3 minutes. Flip the pancakes and cook for another 2-3 minutes on the other side, until golden brown and cooked through.
- Repeat the process with the remaining batter.
- Serve the banana pancakes warm. You can add optional toppings like a drizzle of maple syrup, a dusting of powdered sugar, or a sprinkle of chopped nuts. Enjoy this healthy and satisfying campfire breakfast!
Overnight Oats

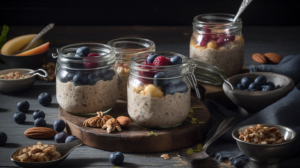
This is a no-cook, prepare-ahead recipe that’s perfect for early mornings. Just mix the oats, milk, Greek yogurt, and honey in a jar, top with your favorite fruits and nuts, and let it sit in the fridge overnight.
Ingredients:
- 2 cups rolled oats
- 2 cups milk (or almond milk for a dairy-free alternative)
- 1 cup Greek yogurt
- 2 tablespoons honey
- 2 servings of your choice of fruit (for example, 2 sliced bananas or 1 cup of mixed berries)
- A handful of nuts (optional, for added crunch and nutrition)
Instructions:
- In a jar or container, combine the rolled oats, milk, and Greek yogurt.
- Add the honey and stir to combine.
- Top with your choice of fruit and nuts.
- Let sit in the fridge overnight and enjoy in the morning.
The beauty of this recipe is that it is highly customizable. You can use any type of milk, yogurt, sweetener, fruit, and nuts you like, making it a versatile recipe that never gets old.
Caprese Skewers

 Ingredients:
- 12 cherry tomatoes
- 12 small mozzarella balls
- 24 fresh basil leaves
- 2 tablespoons of olive oil
- 1 tablespoon of balsamic glaze
Instructions:
- First, gather your ingredients and skewers.
- Thread one cherry tomato onto the skewer.
- Next, thread a small mozzarella ball onto the skewer.
- Follow this with a fresh basil leaf.
- Repeat this pattern until you have four sets of each ingredient on the skewer.
- Repeat the above steps with a second skewer.
- Once both skewers are prepared, drizzle them with the olive oil and then the balsamic glaze.
- The Caprese Skewers are now ready to be enjoyed. This fresh and light recipe is a fantastic appetizer or side dish when you’re cooking on the road!
Balsamic Glaze Recipe
Ingredients:
- 1 cup of balsamic vinegar
- 2 tablespoons of brown sugar
Instructions:
- Pour the balsamic vinegar into a small saucepan.
- Add the brown sugar and stir until it is dissolved.
- Bring the mixture to a boil over medium heat.
- Reduce the heat to low and let it simmer, stirring occasionally. It should take about 15-20 minutes for the mixture to reduce by half and become syrupy.
- Remove the saucepan from the heat and let the balsamic glaze cool. It will continue to thicken as it cools.
Note: This recipe will produce more than needed for two servings of Caprese Skewers. Store the leftover balsamic glaze in an airtight container in the refrigerator. It will keep for several weeks and can be used in other recipes or as a dressing or drizzle for salads and roasted vegetables.
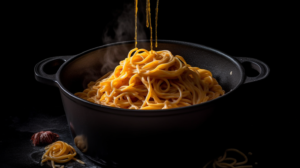
One-Pot Pasta

Ingredients:
- 6 ounces of pasta (your choice, could be spaghetti, penne, etc.)
- 1.5 cups of tomato sauce
- 1 clove of garlic, minced
- 2 tablespoons of olive oil
- 1 teaspoon of Italian seasoning (or a mix of oregano, basil, and thyme)
- Salt and pepper to taste
- 2 cups of water
Instructions:
- In a medium-sized pot, heat the olive oil over medium heat. Add the minced garlic and sauté until fragrant. Be careful not to burn the garlic.
- Add the pasta, tomato sauce, and the water to the pot. Season with Italian seasoning, salt, and pepper. Stir to combine.
- Raise the heat to high and bring the mixture to a boil.
- Once boiling, reduce the heat to low and let it simmer. Stir occasionally to prevent the pasta from sticking to the bottom of the pot.
- Let the pasta cook for about 10-15 minutes, or until the pasta is cooked to your liking and most of the liquid has been absorbed.
- Adjust seasoning if necessary, then serve hot. Enjoy your one-pot pasta!
This meal is perfect for a quick and easy dinner while on the road. Feel free to add any additional ingredients you have on hand, such as vegetables or protein.
Campfire Chili Recipe

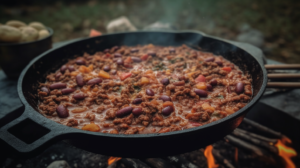
Ingredients:
- 1/2 pound ground meat (beef, turkey, or plant-based)
- 1 can (about 15 oz) beans of your choice, drained and rinsed
- 1 can (about 15 oz) diced tomatoes
- 1 tablespoon chili powder
- 1 teaspoon cumin
- 1/2 large onion, diced
- 2 cloves garlic, minced
- Salt and pepper to taste
Instructions:
- First, you’ll need to heat a pot over your campfire or on your portable stove. Once heated, add in your ground meat. Cook until browned, stirring occasionally to ensure it cooks evenly. If you’re using plant-based meat, follow the package instructions for cooking.
- While your meat is cooking, dice your onion and mince your garlic. Once your meat is browned, add these to the pot and stir. Cook until the onions become translucent, typically about 5 minutes.
- Next, add in your beans and diced tomatoes (including the liquid from the tomatoes for added flavor), followed by your chili powder and cumin. Stir everything together until it’s well combined.
- Let your chili simmer for about 15 minutes, or until it’s heated through. Stir occasionally to prevent any sticking to the bottom of the pot.
- Finally, taste your chili and add salt and pepper as needed. Once it’s seasoned to your liking, it’s ready to serve. Enjoy your campfire chili as a comforting, hearty meal after a day of adventure.
Fish Tacos Recipe

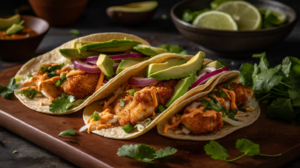
Ingredients:
- 2 medium-sized fish fillets (like tilapia, cod, or mahi-mahi)
- 1/2 cup of pre-made coleslaw mix
- 4 small flour tortillas
- 1/2 cup of tartar sauce (or to taste)
- 1 tablespoon of oil (for grilling the fish)
- Salt and pepper to season the fish
Instructions:
- Season the fish fillets with salt and pepper.
- Heat oil on a grill or campfire-safe pan. Once heated, add the seasoned fish fillets.
- Cook the fish on each side for about 4-5 minutes or until it’s opaque and can easily be flaked with a fork.
- Remove the fish from the grill or pan and let it rest for a few minutes. Once rested, use a fork to flake the fish into pieces.
- Warm the tortillas on the grill or in the pan. Be sure to flip them once or twice to avoid burning.
- Spread each tortilla with a generous amount of tartar sauce.
- Distribute the flaked fish evenly onto the tortillas.
- Top each taco with the coleslaw mix.
- Fold the tortillas in half, and they’re ready to be enjoyed.
Note: You can also add some fresh cilantro, avocado slices, a squeeze of lime, or hot sauce to these tacos for extra flavor. Customize them to your liking!
Homemade Trail Mix


Ingredients:
- 1 cup of mixed nuts (choose your favorite – almonds, walnuts, cashews, etc.)
- 1/2 cup of dried fruit (for example, raisins, cranberries, or chopped dried apricots)
- 1/4 cup of seeds (sunflower or pumpkin seeds are a great choice)
- 1/2 cup of M&Ms or other chocolate pieces (optional, but adds a sweet touch!)
Instructions:
- In a large bowl, combine the mixed nuts, dried fruit, seeds, and M&Ms or chocolate pieces, if using.
- Mix everything together until well combined.
- Divide the mix into two separate containers or reusable bags. The trail mix is now ready to be enjoyed as a snack during your camping adventures. It’s perfect for munching on during a hike, or as a quick energy boost anytime throughout the day.
- Store any leftovers in an airtight container to keep it fresh.
Enjoy your homemade trail mix while exploring the great outdoors!