
What’s New
Overnight Oats

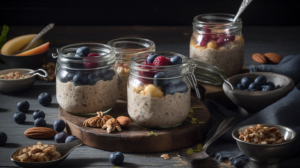
This is a no-cook, prepare-ahead recipe that’s perfect for early mornings. Just mix the oats, milk, Greek yogurt, and honey in a jar, top with your favorite fruits and nuts, and let it sit in the fridge overnight.
Ingredients:
- 2 cups rolled oats
- 2 cups milk (or almond milk for a dairy-free alternative)
- 1 cup Greek yogurt
- 2 tablespoons honey
- 2 servings of your choice of fruit (for example, 2 sliced bananas or 1 cup of mixed berries)
- A handful of nuts (optional, for added crunch and nutrition)
Instructions:
- In a jar or container, combine the rolled oats, milk, and Greek yogurt.
- Add the honey and stir to combine.
- Top with your choice of fruit and nuts.
- Let sit in the fridge overnight and enjoy in the morning.
The beauty of this recipe is that it is highly customizable. You can use any type of milk, yogurt, sweetener, fruit, and nuts you like, making it a versatile recipe that never gets old.
Caprese Skewers

 Ingredients:
- 12 cherry tomatoes
- 12 small mozzarella balls
- 24 fresh basil leaves
- 2 tablespoons of olive oil
- 1 tablespoon of balsamic glaze
Instructions:
- First, gather your ingredients and skewers.
- Thread one cherry tomato onto the skewer.
- Next, thread a small mozzarella ball onto the skewer.
- Follow this with a fresh basil leaf.
- Repeat this pattern until you have four sets of each ingredient on the skewer.
- Repeat the above steps with a second skewer.
- Once both skewers are prepared, drizzle them with the olive oil and then the balsamic glaze.
- The Caprese Skewers are now ready to be enjoyed. This fresh and light recipe is a fantastic appetizer or side dish when you’re cooking on the road!
Balsamic Glaze Recipe
Ingredients:
- 1 cup of balsamic vinegar
- 2 tablespoons of brown sugar
Instructions:
- Pour the balsamic vinegar into a small saucepan.
- Add the brown sugar and stir until it is dissolved.
- Bring the mixture to a boil over medium heat.
- Reduce the heat to low and let it simmer, stirring occasionally. It should take about 15-20 minutes for the mixture to reduce by half and become syrupy.
- Remove the saucepan from the heat and let the balsamic glaze cool. It will continue to thicken as it cools.
Note: This recipe will produce more than needed for two servings of Caprese Skewers. Store the leftover balsamic glaze in an airtight container in the refrigerator. It will keep for several weeks and can be used in other recipes or as a dressing or drizzle for salads and roasted vegetables.
One-Pot Pasta


Ingredients:
- 6 ounces of pasta (your choice, could be spaghetti, penne, etc.)
- 1.5 cups of tomato sauce
- 1 clove of garlic, minced
- 2 tablespoons of olive oil
- 1 teaspoon of Italian seasoning (or a mix of oregano, basil, and thyme)
- Salt and pepper to taste
- 2 cups of water
Instructions:
- In a medium-sized pot, heat the olive oil over medium heat. Add the minced garlic and sauté until fragrant. Be careful not to burn the garlic.
- Add the pasta, tomato sauce, and the water to the pot. Season with Italian seasoning, salt, and pepper. Stir to combine.
- Raise the heat to high and bring the mixture to a boil.
- Once boiling, reduce the heat to low and let it simmer. Stir occasionally to prevent the pasta from sticking to the bottom of the pot.
- Let the pasta cook for about 10-15 minutes, or until the pasta is cooked to your liking and most of the liquid has been absorbed.
- Adjust seasoning if necessary, then serve hot. Enjoy your one-pot pasta!
This meal is perfect for a quick and easy dinner while on the road. Feel free to add any additional ingredients you have on hand, such as vegetables or protein.
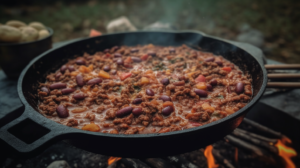
Campfire Chili Recipe

Ingredients:
- 1/2 pound ground meat (beef, turkey, or plant-based)
- 1 can (about 15 oz) beans of your choice, drained and rinsed
- 1 can (about 15 oz) diced tomatoes
- 1 tablespoon chili powder
- 1 teaspoon cumin
- 1/2 large onion, diced
- 2 cloves garlic, minced
- Salt and pepper to taste
Instructions:
- First, you’ll need to heat a pot over your campfire or on your portable stove. Once heated, add in your ground meat. Cook until browned, stirring occasionally to ensure it cooks evenly. If you’re using plant-based meat, follow the package instructions for cooking.
- While your meat is cooking, dice your onion and mince your garlic. Once your meat is browned, add these to the pot and stir. Cook until the onions become translucent, typically about 5 minutes.
- Next, add in your beans and diced tomatoes (including the liquid from the tomatoes for added flavor), followed by your chili powder and cumin. Stir everything together until it’s well combined.
- Let your chili simmer for about 15 minutes, or until it’s heated through. Stir occasionally to prevent any sticking to the bottom of the pot.
- Finally, taste your chili and add salt and pepper as needed. Once it’s seasoned to your liking, it’s ready to serve. Enjoy your campfire chili as a comforting, hearty meal after a day of adventure.
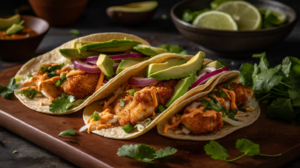
Fish Tacos Recipe

Ingredients:
- 2 medium-sized fish fillets (like tilapia, cod, or mahi-mahi)
- 1/2 cup of pre-made coleslaw mix
- 4 small flour tortillas
- 1/2 cup of tartar sauce (or to taste)
- 1 tablespoon of oil (for grilling the fish)
- Salt and pepper to season the fish
Instructions:
- Season the fish fillets with salt and pepper.
- Heat oil on a grill or campfire-safe pan. Once heated, add the seasoned fish fillets.
- Cook the fish on each side for about 4-5 minutes or until it’s opaque and can easily be flaked with a fork.
- Remove the fish from the grill or pan and let it rest for a few minutes. Once rested, use a fork to flake the fish into pieces.
- Warm the tortillas on the grill or in the pan. Be sure to flip them once or twice to avoid burning.
- Spread each tortilla with a generous amount of tartar sauce.
- Distribute the flaked fish evenly onto the tortillas.
- Top each taco with the coleslaw mix.
- Fold the tortillas in half, and they’re ready to be enjoyed.
Note: You can also add some fresh cilantro, avocado slices, a squeeze of lime, or hot sauce to these tacos for extra flavor. Customize them to your liking!
Homemade Trail Mix


Ingredients:
- 1 cup of mixed nuts (choose your favorite – almonds, walnuts, cashews, etc.)
- 1/2 cup of dried fruit (for example, raisins, cranberries, or chopped dried apricots)
- 1/4 cup of seeds (sunflower or pumpkin seeds are a great choice)
- 1/2 cup of M&Ms or other chocolate pieces (optional, but adds a sweet touch!)
Instructions:
- In a large bowl, combine the mixed nuts, dried fruit, seeds, and M&Ms or chocolate pieces, if using.
- Mix everything together until well combined.
- Divide the mix into two separate containers or reusable bags. The trail mix is now ready to be enjoyed as a snack during your camping adventures. It’s perfect for munching on during a hike, or as a quick energy boost anytime throughout the day.
- Store any leftovers in an airtight container to keep it fresh.
Enjoy your homemade trail mix while exploring the great outdoors!
Campfire Breakfast Burritos


Ingredients:
- 4 large eggs
- 2 sausages or 4 strips of bacon
- 1/2 cup of shredded cheese
- 2 large tortillas
Instructions:
- Start by preparing your ingredients. Crack the eggs into a bowl and whisk until smooth. Slice your sausages or bacon into bite-sized pieces.
- Cook the sausages or bacon over your campfire or on a portable stove until they are well-done. Once cooked, remove them from the heat and set them aside.
- In the same pan, pour in the whisked eggs to make scrambled eggs. Stir the eggs occasionally until they are fully cooked.
- Warm the tortillas over the campfire or stove, making sure to flip them so they heat evenly. This should take about a minute on each side, but you can warm them to your preference.
- Once your tortillas are warm, you can start to assemble your burritos. Start by laying each tortilla flat and spreading half of the scrambled eggs, cooked sausage or bacon, and shredded cheese on each one.
- Roll up your burritos by folding in the sides of the tortilla over the filling, then rolling from the bottom up. Your breakfast burritos are now ready to enjoy!
Remember, you can customize this recipe to your tastes. You might want to add some salsa, hot sauce, or even some grilled veggies for added flavor. Enjoy your campfire breakfast!
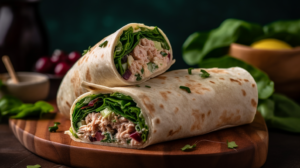
Tuna Salad Wraps for Two

Ingredients:
- 2 (5-ounce) cans of tuna
- 2 tablespoons of mayonnaise
- 1/2 cup of diced celery
- 2 large lettuce leaves
- 2 large tortilla wraps
Instructions:
- In a bowl, mix the drained tuna with the mayonnaise and diced celery until well combined.
- Lay out your tortillas and place a lettuce leaf in the middle of each one.
- Divide the tuna salad evenly between the two tortillas, placing it on top of the lettuce.
- Carefully roll up the tortillas, making sure to tuck in the ends to hold all the ingredients inside.
- Cut in half and serve immediately, or wrap them up and save them for later – they make a great on-the-go lunch option!
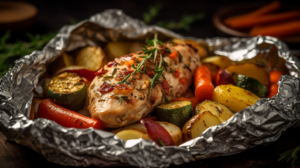
Chicken and Veggie Foil Packets

Ingredients:
- 2 boneless, skinless chicken breasts
- 1 red bell pepper, sliced
- 1 green bell pepper, sliced
- 1 medium onion, sliced
- 1 medium zucchini, sliced
- 2 tablespoons of olive oil
- Salt and pepper to taste
Instructions:
- Preheat your campfire or grill to medium heat.
- Take two large pieces of aluminum foil and place one chicken breast in the center of each piece.
- Divide the bell peppers, onion, and zucchini evenly between the two foil packets, arranging them around the chicken.
- Drizzle each packet with the olive oil and season with salt and pepper.
- Fold the foil over the chicken and vegetables, sealing it to create a packet.
- Place the foil packets on the campfire grill and cook for about 20-25 minutes, or until the chicken is cooked through and the vegetables are tender.
- Carefully open the packets (watch for steam), check the chicken is cooked thoroughly, and serve right from the foil for an easy clean-up. Enjoy!
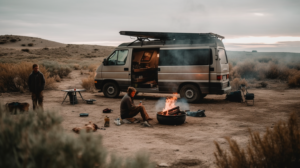
Budgeting for Van Life: Tips for Saving and Managing Finances on the Road


Oh, the freedom of the open road, waking up to a new view every morning, the spontaneity and adventure that van life promises! But there’s something that needs to be addressed, something that underpins the whole van life experience – budgeting. Yep, we’re talking dollars and cents, folks! Let’s dive into understanding the costs of van life, creating a budget, saving for your adventure, and more.
Understanding the Costs of Van Life
Living the van life isn’t without its expenses. To prepare financially for van life, let’s break down the typical costs.
First, there’s the cost of purchasing or renting a van. Prices can vary dramatically based on the type of van, its age, condition, and the level of conversion if you’re looking for a camper style setup. Next up is insurance, which again can range widely based on factors like the vehicle’s value, how it’s been modified, and your travel plans.
Ongoing costs include maintenance and repairs, fuel, and if you choose, campsite fees. Van life also includes the cost of living expenses, such as food, entertainment, and perhaps a gym membership for shower facilities. And let’s not forget about setting aside an emergency fund because unexpected things do happen!
Creating a Van Life Budget
Now that we understand the costs associated with van life, it’s time to create a realistic and flexible budget. This budget should account for fixed costs (like insurance and potential campsite fees) and variable costs (like fuel, food, and fun). Don’t forget about those sneaky, occasional expenses like vehicle services or replacing worn-out gear. Keep in mind; your budget will be unique to your lifestyle and needs.
Saving for Van Life
Now you might be thinking, “Okay, this sounds a bit expensive, how can I save up for van life?” Well, there are plenty of strategies for saving money in preparation for van life. Downsizing is a big one. Before hitting the road, many people sell their belongings, which not only raises funds but also makes the transition to a minimalist lifestyle easier. Consider saving on living expenses by cutting unnecessary subscriptions, eating out less, and doing DIY projects.
Frugal Living on the Road
Living frugally on the road can make your savings stretch further. Cooking your own meals instead of dining out can make a huge difference to your wallet. Look for free camping spots using apps or websites that other van lifers recommend. Take advantage of free activities – hiking, swimming, and star-gazing don’t cost a dime! And of course, conserve resources where you can. Less water usage means fewer fill-ups, and less power usage means less fuel or time needed to recharge.
Dealing with Unexpected Costs
Unexpected costs are a part of life, even more so when your home has wheels. Having an emergency fund is crucial. This can cover unexpected repairs, healthcare costs, or travel expenses if you need to return home unexpectedly. Ensure you have adequate insurance to cover potential mishaps and save you from significant financial stress.
Tools and Resources for Managing Finances on the Road
Managing finances while traveling doesn’t have to be a chore. There are plenty of tools and resources out there to help. Budgeting apps can be a godsend, allowing you to track spending and see where your money is going. Online banking is another essential, making it easy to handle transactions and check your accounts, no matter where you are.
Conclusion
Budgeting for van life is essential for a successful and stress-free adventure. It’s not always the most fun thing to think about, but with careful planning and management, the financial side of van life can become second nature
Generating Income on the Road
While living frugally can help keep costs down, having a steady income stream while on the road can significantly ease financial stress. Here are some ways van lifers make money while traveling:
- Remote Work – With the rise of digital nomad culture, many companies are offering remote work opportunities. Skills like writing, programming, graphic design, and digital marketing are in high demand.
- Freelance Gigs – Platforms like Upwork and Fiverr connect freelancers with clients needing services, making it easy to pick up work as your travel schedule allows.
- Seasonal Work – Many van lifers plan their travels around seasonal work opportunities. Jobs at national parks, harvest work at farms, or holiday work at Amazon are just a few examples.
Money-Saving Apps and Memberships
There are plenty of apps and memberships that can save you money on the road:
- GasBuddy – This app helps you find the cheapest gas prices nearby, saving you money on one of van life’s major expenses.
- iOverlander – A crowd-sourced app that helps you find free camping spots, among other services.
- Harvest Hosts Membership – With a yearly membership, you can stay for free at hundreds of wineries, farms, and other unique locations across the USA.
- National Park Pass – If you plan to visit many national parks, this pass could save you a lot on entrance fees.
- Planet Fitness Membership – Nationwide, inexpensive, and comes with the added benefit of showers!
Remember, every penny counts when living the van life. It’s all about balancing income and expenses, and making the most out of what you have. By following these tips, you’ll be well on your way to achieving financial freedom on the road!